Lab 9 - Dockerizing the solution
During this lab you will take the existing solution and port it to use Docker containers.
Goals for this lab:
- Run existing application
- Add Docker support to .NET Core application
- Add Docker support to Angular application
- Run and debug applications from containers
- Build container images
- Running SQL Server in a Docker container
Run existing application
You will first start with running the existing ASP.NET Core Web API from Visual Studio. Make sure you have cloned the Git repository, or return to Lab 1 - Getting Started to clone it now if you do not have the sources. Switch to the StartDocker branch by using this command:
git checkout StartDocker
Important
Make sure you have switched to the
StartDockerbranch to use the right .NET solution. If you are still on themasterbranch, you will use the completed solution.Also verify you have configured ‘Docker Desktop’ to run Linux containers.
If your VS2019 debugger won’t start and attach, reset ‘Docker Desktop’ to its factory defaults and recreate network shares by using the settings screen.
Open the solution BuildingModernWebApplications.sln in Visual Studio 2019. Take your time to navigate the code and familiarize yourself with the Web API project and Angular SPA in the solution if you haven’t built that yourself in the previous labs. You should be able to identify:
RetroGamingWebAPI- ASP.NET Core Web APIRetroGamingSPA- Angular SPA frontend
Switching to SQL Server
Up until now, the web API has used an in-memory database provider to serve as the backing store. You will switch to SQL Server for Linux container instance to provide the backend for data storage on your development machine. Later you will be able to change this to a hosted Azure SQL Server instance.
Let’s start by replacing the in-memory provider with the SQL Server provider in the RetroGamingWebAPI project. Replace AddDbContext in ConfigureServices of the Startup.cs class with the following:
public void ConfigureServices(IServiceCollection services)
{
  // Replace existing services.AddDbContext with the following:
  services.AddDbContext<RetroGamingContext>(options =>
  {
      string connectionString =
            Configuration.GetConnectionString("RetroGamingContext");
      options.UseSqlServer(connectionString, sqlOptions =>
        {
            sqlOptions.EnableRetryOnFailure(
            maxRetryCount: 5,
            maxRetryDelay: TimeSpan.FromSeconds(30),
            errorNumbersToAdd: null);
        });
  });

  /* ... */
}
Notice how it uses the same RetroGamingContext, but it now reads a connection string from the application settings file appsettings.json.
Add a connection string in the application settings file :appsettings.json:
{
  "ConnectionStrings": {
    "RetroGamingContext": "Server=tcp:127.0.0.1,5433;Database=RetroGaming2019;User Id=sa;Password=Pass@word;Trusted_Connection=False;"
  },
  /* ... */
}
Start a container instance for SQL Server for Linux, if you did not already do this in the previous lab.
docker run -e ACCEPT_EULA=Y -e MSSQL_PID=Developer -e SA_PASSWORD="Pass@word" --name sqldocker -p 5433:1433 -d mcr.microsoft.com/mssql/server
Right-click the RetroGamingWebAPI in Visual Studio and start debugging it.
Navigate to the Web API endpoint at https://localhost:5001/openapi. Experiment with the GET and POST operations that are offered from the Open API user interface. Try to retrieve the list of high scores, and add a new high score for one of the registered player names.
Make sure you know how this Web API is implemented. Set breakpoints if necessary and navigate the flow of the application for the home page.
Add Docker support
Visual Studio 2019 offers tooling for adding support to run your application in a Docker container. You will first add container support to the Web API project.
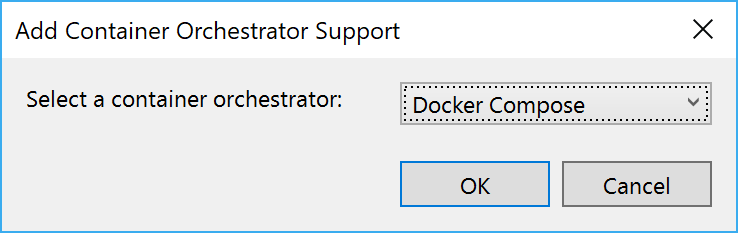
To get started you can right-click the RetroGamingWebApi project and select Add Container Orchestrator Support from the context menu. Choose Docker Compose as the local orchestrator from the dropdown.
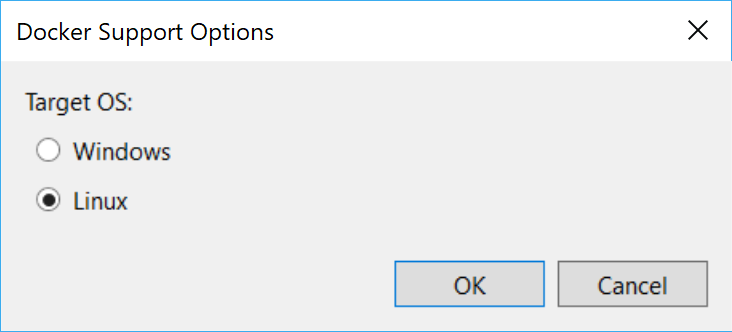
In the next dialog, choose Linux as the target operating system.
Observe the changes that Visual Studio 2019 makes to your solution.
First of all, the Web API project has a new file named Dockerfile, that uses stages to build your application (multi-stage Dockerfile). Take a look at the Dockerfile in your Web API project:
FROM mcr.microsoft.com/dotnet/core/aspnet:3.0-buster-slim AS base
WORKDIR /app
EXPOSE 80
EXPOSE 443

FROM mcr.microsoft.com/dotnet/core/sdk:3.0-buster AS build
WORKDIR /src
COPY ["RetroGamingWebAPI/RetroGamingWebAPI.csproj", "RetroGamingWebAPI/"]
RUN dotnet restore "RetroGamingWebAPI/RetroGamingWebAPI.csproj"
COPY . .
WORKDIR "/src/RetroGamingWebAPI"
RUN dotnet build "RetroGamingWebAPI.csproj" -c Release -o /app/build

FROM build AS publish
RUN dotnet publish "RetroGamingWebAPI.csproj" -c Release -o /app/publish

FROM base AS final
WORKDIR /app
COPY --from=publish /app/publish .
ENTRYPOINT ["dotnet", "RetroGamingWebAPI.dll"]
The Dockerfile contains 4 stages:
- The first stage creates a clean base image, that is based on the runtime only.
- The second stage uses an SDK image to build the application.
- The third stage publishes the build application
- The final stage uses the
COPY --fromsyntax to only use the published output of the previous stage to use as the application to run87.
Read more about multi-stage builds here
Most noticably you will see that a new docker-compose project has been added containing a docker-compose.yml. It is now your start project for the solution. (If it’s not, configure it as the startup project.)
A Dockerfile does not define relationships and dependencies that could exist in many different combinations of containers, images, run-time details and environmental settings. Typically an application consists of multiple running containers. Managing each of these individually is both difficult and labor intensive.
docker-dompose is the tool of choice for this lab to manage compositions of containers in your development environment. It allows you to use a command-line interface, similar to the Docker CLI, to interact with compositions defined in a docker-compose.yml file.
There are other tools that also allow the creation of compositions, such as the YAML files for Kubernetes.
Add Docker support to Angular application
The Angular application also needs to be made available for Docker. Start by creating a Dockerfile in the root of RetroGamingSPA project.
### Build ###
FROM node:12.13.0-alpine AS build

WORKDIR /app

COPY RetroGamingSPA/. .

RUN npm install && npm run build

### Run ###
FROM nginx:alpine

COPY --from=build /app/dist/* /usr/share/nginx/html/
Try running the docker container from the BuildingModernWebApplications root (where the docker-compose.yml is located) directory:
docker build -t retrogamingspa:latest RetroGamingSPA/.
docker run -p 4200:80 retrogamingspa:latest
Navigate to http://localhost:4200 and see if the front-end is running.
Working with compositions and Docker Compose
Let’s start by building and running with docker-compose and get familiar with its concepts. The following docker-compose.yml and docker-compose.override.yml have been added by adding Docker Support in the previous exercise.
docker-compose.yml
version: '3.4'

services:
  retrogamingwebapi:
    image: ${DOCKER_REGISTRY-}retrogamingwebapi
    build:
      context: .
      dockerfile: RetroGamingWebAPI/Dockerfile
docker-compose.override.yml
version: '3.4'

services:
  retrogamingwebapi:
    environment:
      - ASPNETCORE_ENVIRONMENT=Development
      - ASPNETCORE_URLS=https://+:443;http://+:80
      - ASPNETCORE_HTTPS_PORT=44366
    ports:
      - "49154:80"
      - "44366:443"
    volumes:
      - ${APPDATA}/Microsoft/UserSecrets:/root/.microsoft/usersecrets:ro
      - ${APPDATA}/ASP.NET/Https:/root/.aspnet/https:ro
The definitions in the docker-compose.yml file describe the build stage of the retrogamingwebapi service from a Dockerfile. The definitions in the docker-compose.override.yml describe the run stage of the service.
Start the following composition command at the root BuildingModernWebApplications where the Docker Compose YAML files are located:
docker-compose up
The command will up (meaning ‘start’) the composition and perform a build and publish of the RetroGamingWebAPI project in the solution BuildingModernWebApplications.
You can also use this in your build pipeline to perform the build and publishing of the binaries required to create the container images of the solution without the need for Visual Studio 2019 or Code.
Add the Angular application to Docker Compose
Add a frontend service to docker-compose.yml
services:
  retrogamingwebapi:
    # ... #

  frontend:
    build:
      context: .
      dockerfile: RetroGamingSPA/Dockerfile
Configure how to run the frontend service in docker-compose.override.yml:
services:
  retrogamingwebapi:
    # ... #

  frontend:
    ports:
      - "4200:80"
Start the following composition command at the root BuildingModernWebApplications where the Docker Compose YAML files are located:
docker-compose up
Change the url of the Angular application API rootUrl in AppModule in file RetroGamingSPA/src/app/app.module.ts to the configured API port in the docker-compose.override.yml
@NgModule({
  declarations: [
    /* ... */
  ],
  imports: [
    /* ... */
    ApiModule.forRoot({ rootUrl: 'https://localhost:44366' }),
  ],
  providers: [],
  bootstrap: [AppComponent]
})
export class AppModule { }
Run the docker compose and notice that the frontend and backend API integrate once again.
Docker Compose in Visual Studio 2019
The tooling support of Visual Studio 2019 for Docker and Docker Compose takes care of compiling the sources and building images for you. You do not need a build file like you have just used.
Notice how the docker-compose.override.yml file contains some port mappings, defining the ports inside the container and the composition and outside of it. Your actual port numbers are most likely different:
ports:
  - "14069:80"
  - "44325:443"
This implies that the URLs for your Web API will not be 5000 and 5001 anymore, but the ones listed in the override file instead.
You can still use docker-compose.exe to start the composition by hand:
docker-compose -f docker-compose.yml -f docker-compose.override.yml up
or simply
docker-compose up
as the tooling assumes that your files are named docker-compose.yml and docker-compose.override.yml respectively.
Run your solution using the commands and navigate to the api/v1/leaderboard endpoint. If that works, run the docker-compose project in Visual Studio 2019.
If you encounter the error ‘The DOCKER_REGISTRY variable is not set. Defaulting to a blank string.’, make sure you started Visual Studio as an administrator
Question
Does the application still work?
Now that the Web API project is running from a Docker container, it is not working anymore. You can try to find what is causing the issue, but do not spend too much time to try to fix it. We will do that next.
Some things to try if you feel like finding the cause:
- Inspect the running and stopped container
- Try to reach the Web API from http://localhost:44325/openapi. Remember to replace the port number with your specific one.
- Verify application settings for the web API project.
Running SQL Server in a Docker container
Now that your application is running the Web API project in a Docker container, you can also run SQL Server in the same composition. This is convenient for isolated development and testing purposes. It eliminates the need to install SQL Server locally and to start the container for SQL Server manually.
Go ahead and add the definition for a container service in the docker-compose.override.yml file.
retrogamingwebapi:
    # ... #
    depends_on:
      - "sqlserver"


sqlserver:
  image: mcr.microsoft.com/mssql/server
  environment:
    - SA_PASSWORD=Pass@word
    - MSSQL_PID=Developer
    - ACCEPT_EULA=Y
  ports:
    - "5433:1433"
Also make retrogamingwebapi depend on sqlserver, so that the services are executed in the correct order.
Which additional changes are needed?
Stop and think about any other changes that might be required to take into account that the database server is now also running in a container.
Start the solution by pressing F5. See if it works correctly. Timebox your efforts to try to fix any errors.
As it turns out your connection string to the database is no longer valid. When running inside the composition, services such as the Web API and SQL Server instance are resolved by their internal name. Special addresses like 127.0.0.1, localhost or your machine name have a different meaning and do not resolve correctly.
Hint
Changing the setting in the
appsettings.jsonfile will work and you could choose to do so for now. It does mean that the setting for running without container will not work anymore. So, what other place can you think of that might work?
You will need to change the connection string for the Web API to reflect the new way of hosting of the database. Add a new environment variable for the connection string of the leaderboard.webapi service in the docker-compose.override.yml file:
- ConnectionStrings__RetroGamingContext=Server=tcp:sqlserver;Database=RetroGaming2048;User Id=sa;Password=Pass@word;Trusted_Connection=False;
Strange connection string or not?
There are at least two remarkable things in this connection string. Can you spot them and explain why? Don’t worry if not, as we will look at this in the Networking lab.
With this change, you should be able to run your Web API completely from containers. Make sure you have stopped any containers related to the application. Give it a try and fix any issues that occur.
Debugging with Docker container instances
One of the nicest features of the Docker support in Visual Studio 2019 is the debugging support while running container instances. Check out how easy debugging is by stepping through the application like before.
Put a breakpoint at the first statement of the Get method in the LeaderboardController class in the RetroGamingWebAPI project. Run the application by pressing F5. You should be hitting the breakpoint.
Building container images
Start a command prompt and use the Docker CLI to check which container instances are running at the moment.
docker ps
There should be two containers related to the application:
- SQL Server in
dockercompose<id>_sqlserver_1. - Web API in
dockercompose<id>_retrogamingwebapi_1.
where <id> is a random unique integer value.
New container images
Which new container images are on your system at the moment? Check your images list with the Docker CLI.
Stop your application if necessary. Verify that any container instances are actually stopped. If not, stop them by executing the following command for each of the container instances:
docker kill <container-id>
Remember that you can use the first unique part of the container ID or its name
Note that you can get the same result by performing running Clean solution from the Build menu in Visual Studio.
Now, try and run the Web application image yourself. Start a container instance.
docker run -p 8080:80 -it --name webapi retrogamingwebapi:dev
Check whether the web application is working. It shouldn’t work and you’ll find that it brings you in a bash shell on Linux.
root@65e40486ab0f:/app#
Your container image does not contain any of the binaries that make your ASP.NET Core Web API run. Visual Studio 2019 uses volume mapping to map the files on your file system into the running container, so it can detect any changes thereby allowing small edits during debug sessions.
Debug images from Visual Studio 2019
Remember that Visual Studio 2019 creates Debug images that do not work when run from the Docker CLI. Only Release buils have images that are complete and can be run without Visual Studio 2019.
Asking for help
Remember that you can ask your proctor for help. Also, working with fellow attendees is highly recommended, as it can be fun and might be faster. Of course, you are free to offer help when asked.
Wrapup
In this lab you have added Docker support to run both of your projects from Docker containers as well as the SQL Server instance. You enhanced the Docker Compose file that describes the composition of your complete application. In the next lab you will improve the networking part of the composition.
Continue with Lab 10 - Networking.